How to Overcome Automatic Scroll Up in Blogger XML Editor Blogger update information Some time ago, blogger made an update about the XML editor system. The most
Blogger update information
Some time ago, blogger made an update about the XML editor system. The most striking thing about this update is the change in the behavior of the XML Editor in storing and validating XML code. In the current system, all code processing activities are carried out directly. Such as sorting attributes alphabetically, parsing special characters, and so on.
On the current system, when the save process is complete, the code that we see in the XML editor is already the final code. This is unlike the previous system which did code processing after the editor interface was closed.
Problem
On this new system, there is an issue related to the behavior of the XML editor when the XML save process is complete. The editor interface will automatically scroll to the top every time the save process is complete. This is certainly very disturbing because we have to go back and forth to the last editing position. Especially for XML code that already involves tens of thousands of code, this will greatly hinder editing activities.
Forum Problem Posts
- https://support.google.com/blogger/thread/117960083/html-editor-auto-scroll-up?hl=en
- https://www.quora.com/How-do-I-make-my-blog-header-stop-showing-up-when-scrolling-up
Solution
This problem can be solved by injecting javascript code to prevent the blogger auto scroll event effect. Simply put, when the auto scroll is running and the scroll position is at the top, this function will reset the scroll position to the last position before saving. Function injection is performed using the browser's bookmark system.
Bookmark Script
javascript:(()=>{/*Bookmark script by webmanajemen.com: Prevent Auto Scroll Up Blogger XML Editor*/const e=window,l=document,t=e=>l.getElementsByClassName(e),n=(e,...l)=>{for(const t of l)e.appendChild(t)},r=e=>l.createElement(e),s=t("xLh0Gb"),o=t("CodeMirror-scroll"),a=s?s[s.length-1]:null,c=o?o[o.length-1]:null;if(a&&c){let t,s,o,i;{const e=r("style"),t=l.getElementsByTagName("head")[0],s=[".{{s}}{background:#f5f5f5;color:#f57c00;font-size:12px;padding:10px 15px;border-radius: 60px;margin-right:10px;transition:all .3s;font-weight:bold}"];n(e,l.createTextNode(s.join("").replace(/{{s}}/g,"w-prevent-reset-scroll"))),n(t,e),(i=r("div")).className="w-prevent-reset-scroll",i.innerHTML="AUTO SCROLL DISABLED",((e,l)=>{const t=e.firstElementChild;t?e.insertBefore(l,t):e.appendChild(l)})(a,i)}const d=()=>c.scrollTop,p=()=>c.scrollLeft,f=()=>{if(!t){(e=>{const t=l.getElementsByClassName(e)[0];return t||null})("aGJE1b")&&(s=d(),o=p(),0!==s&&(t=!0,c.onscroll=g,e.clearInterval(f)))}},g=()=>{c.scrollTo(o,s),c.onscroll=m,t=!1,e.setInterval(f,500)},m=()=>{};e.setInterval(f,500)}})();Installation
The point of this installation process is to add a Bookmark in the browser by putting the script above as a URL. This installation guide uses the Google Chrome browser with the following steps:
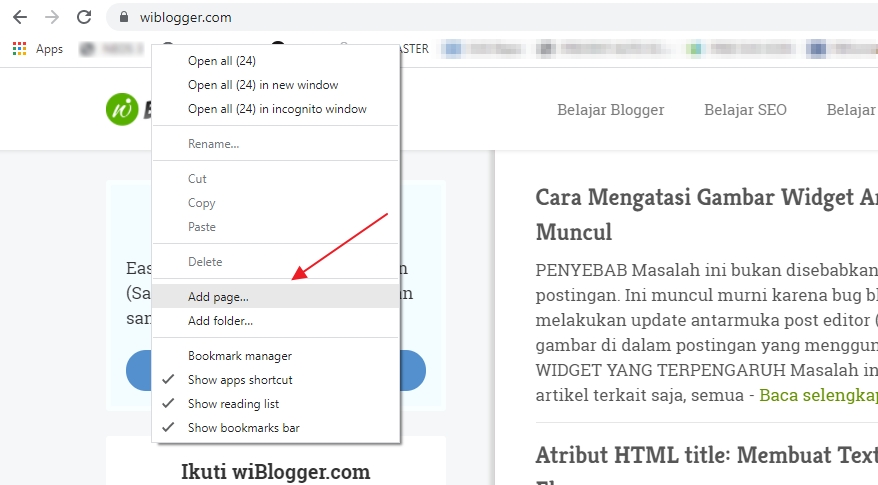
- In the Bookmarks bar of the browser, right click and select Add page.

- Write name the bookmark as you wish in the Name section. Copy and Paste all the bookmark script code above into the URL section. Finally, save bookmarks to complete the installation process.
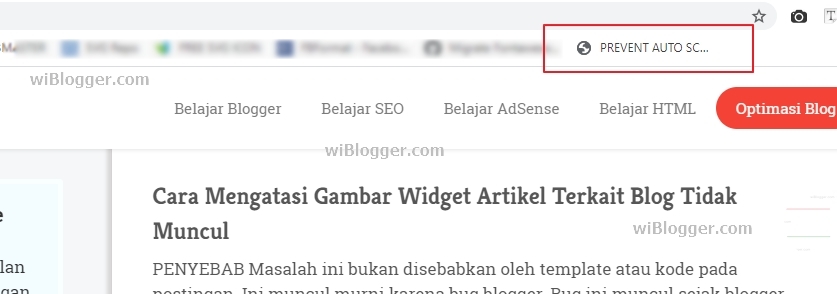
If there are no errors, the bookmark you added should already be in the Bookmarks bar of the browser. More or less like this:
Usage
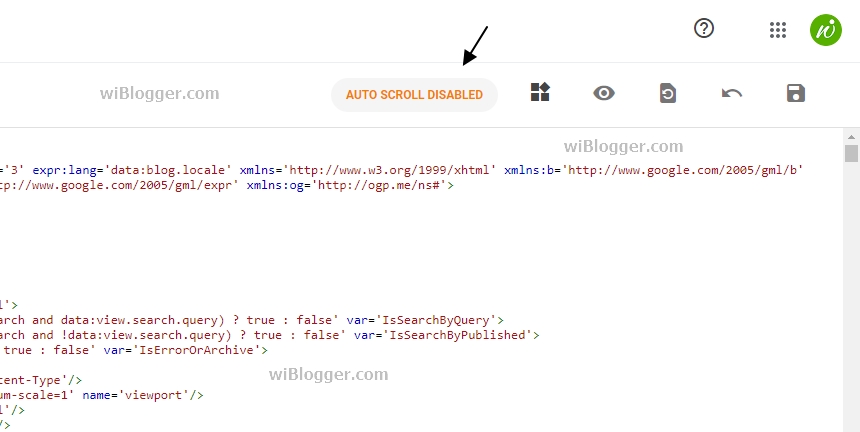
On the XML editor tab, Click Created Bookmark. You will see a new indicator element added at the top of the XML editor informing you that the auto scroll prevention function is enabled. 
Browser support
This function has been tested and works well on the latest version of Google Chrome browser. For other browsers, please try.
Gallery - How to Overcome Automatic Scroll Up in Blogger XML Editor


